Okay, so here’s the thing—I never thought I’d be the person making themed food for Halloween. But then my neighbor Jenny saw these cheeseburger skulls Halloween dinner ideas on Pinterest and basically wouldn’t stop talking about them. And honestly? I’m glad she did because these Halloween chicken parm sliders turned out to be a total game-changer.
Look, I’m gonna be honest with you. The first time I tried making these, it was a complete disaster. The chicken was dry, the cheese looked more like melted plastic, and don’t even get me started on my attempt at “skull shapes.” My 8-year-old took one look and said, “Mom, these look like sad ghosts.” Ouch.
But here we are, three attempts later, and I’ve finally cracked the code. These cheeseburger skulls Halloween dinner sliders are now the star of every October gathering, and people keep asking me for the recipe. So here goes nothing—the good, the bad, and the slightly burnt.
Table of Contents
Why These Halloween Chicken Parm Sliders Actually Work
Now, here’s what makes these different from your regular chicken parm sliders. The Hawaiian rolls—and trust me, it has to be Hawaiian rolls, not regular slider buns—give you this perfect sweet-savory thing going on. Plus, they’re small enough that kids don’t get overwhelmed, but adults can easily grab two or three without feeling like they’re being total pigs.
The skull theme comes from how you arrange the cheese and some strategic olive placement. Sounds weird, I know. My mom thought I’d lost my mind when I explained it. But stick with me here.
What You’ll Need (And My Shopping Disasters)
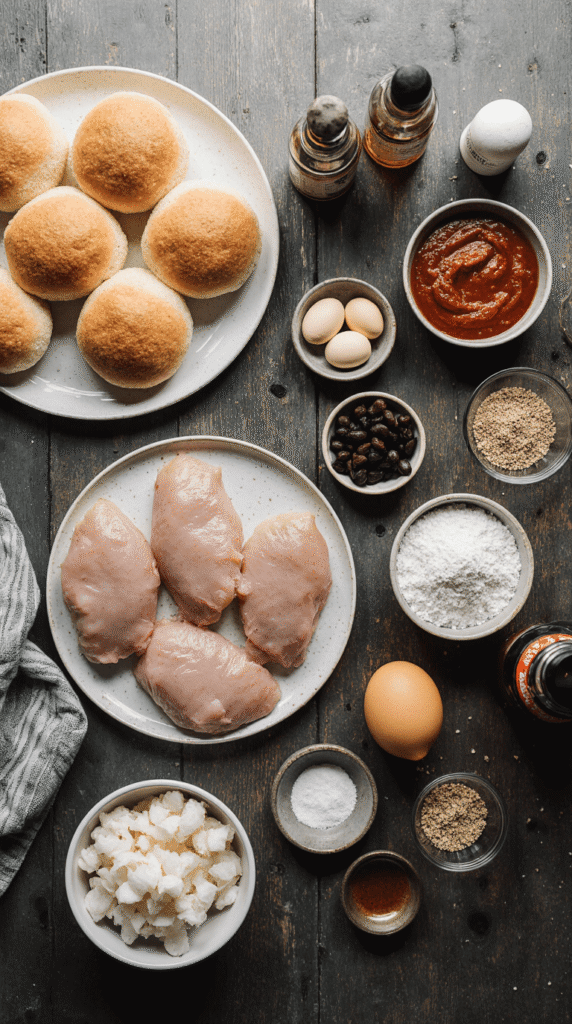
For the Chicken:
- 1 package (about 2 lbs) chicken breast tenderloins (or cut your own, whatever)
- 2 cups panko breadcrumbs
- 1 cup all-purpose flour
- 3 large eggs
- 1 tsp garlic powder (I use way more because I’m obsessed)
- 1 tsp Italian seasoning
- Salt and pepper to taste
- Vegetable oil for frying (don’t use olive oil—learned this the hard way)
For Assembly:
- 1 package Hawaiian rolls (12 count)
- 2 cups marinara sauce (I always use Rao’s because I’m fancy like that)
- 8 oz fresh mozzarella, sliced thin
- 1/2 cup grated Parmesan
- Black olives for the “skull eyes” (pitted, obviously)
- Fresh basil leaves (if you can find them—my grocery store is hit or miss)
The Cheese Situation: Here’s where I messed up initially. Don’t buy pre-shredded mozzarella for this. Just don’t. It doesn’t melt right and you’ll end up with these weird rubbery strings. Get the fresh stuff from the deli section or those little balls of mozzarella. Your future self will thank you.
The Method (AKA How I Finally Got This Right)
Step 1: Prep Your Chicken (Don’t Skip This)
First things first—preheat your oven to 400°F. I always forget this step and then stand around waiting for 15 minutes like an idiot.
Set up your breading station with three shallow dishes: flour in one, beaten eggs in another, and panko mixed with garlic powder and Italian seasoning in the third. Season your chicken tenderloins with salt and pepper.
Now here’s the key—and I think… no, I know this works better when you really press the breadcrumbs into the chicken. Like, really smoosh them on there. Don’t be gentle about it.
Step 2: The Frying Part (Where Things Get Real)
Heat about 1/2 inch of oil in a large skillet over medium heat. You’ll know it’s ready when you drop a breadcrumb in and it sizzles immediately.
Fry the chicken pieces for about 3-4 minutes per side until golden brown. Don’t overcrowd the pan—I learned this lesson when half my chicken turned into charcoal because I was trying to rush things.
The chicken doesn’t need to be completely cooked through at this point since it’s going in the oven. We’re just getting that crispy exterior.
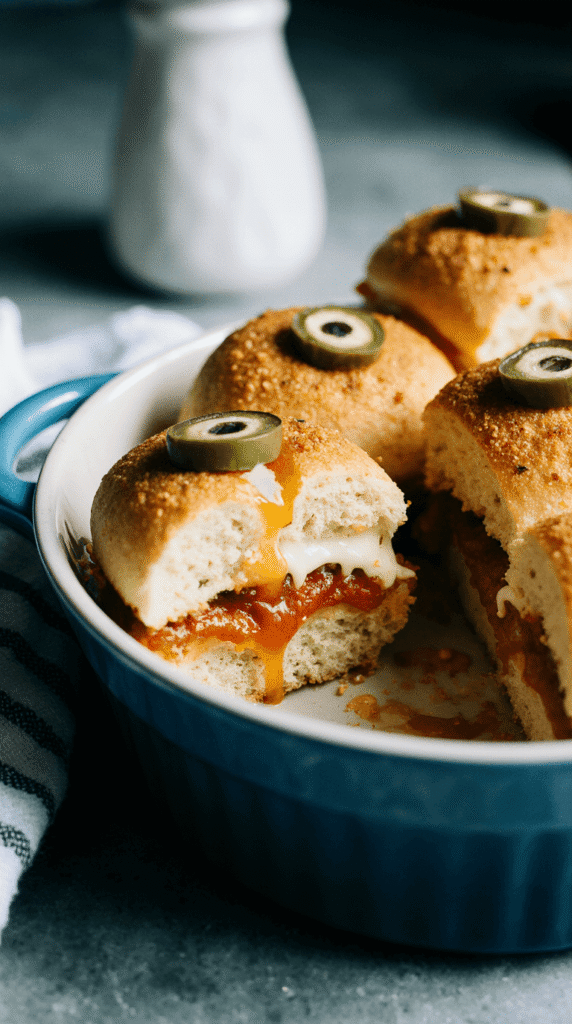
Step 3: Assembly Time (The Fun Part)
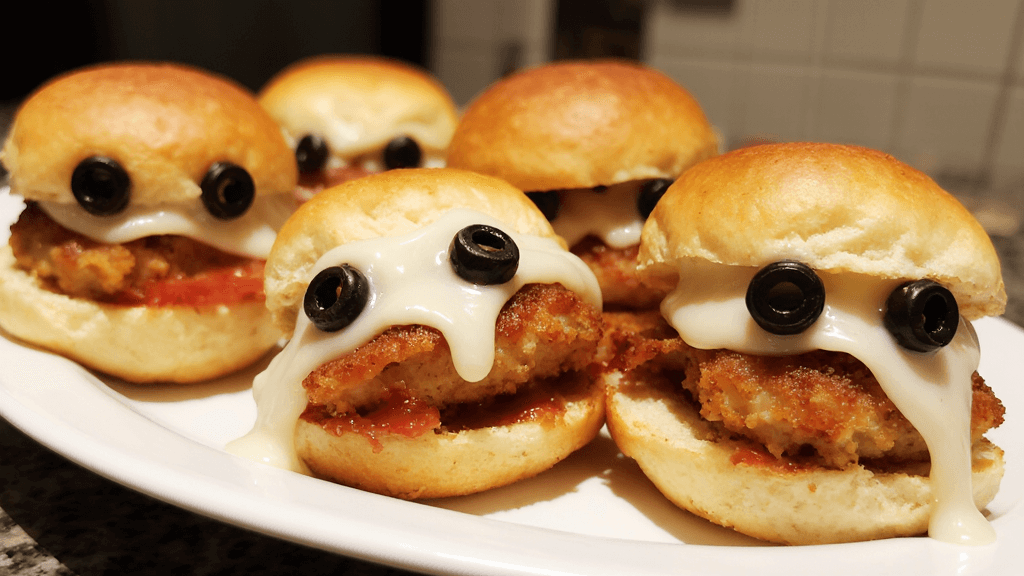
Cut your Hawaiian rolls in half horizontally—keep them attached as one big sheet. This is key for the cheeseburger skulls Halloween dinner presentation.
Place the bottom half in a 9×13 baking dish. Spread about half the marinara sauce on the bottom rolls. Layer on your fried chicken pieces, then the remaining marinara sauce.
Now for the skull magic: place thin slices of fresh mozzarella on top, but leave some gaps so you can see the marinara underneath. This creates the skull effect when everything melts together.
Step 4: The Skull Eyes (Most Important Step)
Before you put the top buns on, you need to create the “eyes.” Take your black olives and cut them in half. Press them into the mozzarella where the eyes would be on a skull. I usually do two per slider, but honestly, sometimes I get carried away and make some with three eyes because why not?
Top with the other half of the rolls and brush the tops with a little melted butter. Sprinkle with Parmesan cheese.
Step 5: Bake and Don’t Panic
Cover with foil and bake for 15 minutes. Remove the foil and bake another 5-10 minutes until the cheese is melted and bubbly and the tops are golden brown.
Here’s where I always panic and think I’ve ruined everything because the cheese looks all melty and weird. But that’s normal! It’ll set up as it cools.
My Hard-Learned Tips for Cheeseburger Skulls Halloween Dinner Success
The Olive Situation: Some people use pieces of pepperoni or even small pieces of bell pepper for the eyes, but olives work best. They stay put and don’t shrink during baking. Plus, most kids will just pick them off anyway.
Make-Ahead Magic: You can assemble these completely and refrigerate for up to 24 hours before baking. Just add an extra 5 minutes to the bake time if they’re going in cold.
Leftover Strategy: These actually reheat really well in a 350°F oven for about 10 minutes. Don’t microwave them—the rolls get all soggy and sad.
Size Matters: If you’re feeding a crowd, make two pans. Trust me on this one. I thought one pan would be enough for our Halloween party last year. It wasn’t. People were fighting over the last few sliders.
The Real Talk About These Halloween Chicken Parm Sliders
Look, are they Instagram-perfect? No. Do they taste amazing and make everyone at your Halloween party happy? Absolutely.
My neighbor’s kids call them “scary sandwiches” and ask for them year-round now. Which is fine by me because they’re honestly easier than making individual chicken parm servings, and way more fun.
The best part? Even if your “skulls” look more like abstract art than actual skulls (mine usually do), people still get the theme and think you’re some kind of Halloween cooking genius. Which, let’s be honest, we’ll take.
Serving These Bad Boys
I usually serve these with some simple sides—maybe a green salad to balance out all the cheese, or some roasted vegetables if I’m feeling ambitious. Honestly though, most people just want the sliders and maybe some chips.
For drinks, they go great with beer or wine for the adults, and kids are happy with whatever juice boxes you’ve got lying around.
When Things Go Wrong (Because They Will)
If your chicken gets too brown during frying, don’t panic. Just reduce the oven time a bit. If the cheese isn’t melting properly, stick it under the broiler for a minute or two—but watch it like a hawk because it goes from perfect to burnt in about 30 seconds.
And if your skull eyes migrate during baking (they sometimes do), just push them back where they belong when you take the pan out. No one will notice.
The Bottom Line on Cheeseburger Skulls Halloween Dinner
These Halloween chicken parm sliders are basically foolproof once you get the hang of them. They’re fancy enough that people think you spent all day cooking, but easy enough that you can make them after work without having a breakdown.
Plus, they’re perfect for that weird Halloween dinner zone where you want something themed but also actually filling. Not just candy and chips, but not a full traditional dinner either.
Seriously, try this and tell me what you think. And if you come up with any variations or improvements, let me know in the comments because I’m always looking for ways to make these even better.
Happy Halloween cooking! (And may your smoke alarms stay quiet)
Now I’m craving these again. Thanks a lot, brain.
Halloween Chicken Parm Sliders
Spooky Halloween chicken parm sliders made with Hawaiian rolls, crispy breaded chicken, marinara sauce, and melted mozzarella arranged as skull shapes with black olive eyes. Perfect cheeseburger skulls Halloween dinner for parties and family gatherings.
Ingredients
- 2 lbs chicken breast tenderloins
- 2 cups panko breadcrumbs
- 1 cup all-purpose flour
- 3 large eggs
- 1 tsp garlic powder
- 1 tsp Italian seasoning
- Salt and pepper to taste
- Vegetable oil for frying
- 1 package Hawaiian rolls (12 count)
- 2 cups marinara sauce
- 8 oz fresh mozzarella, sliced thin
- 1/2 cup grated Parmesan
- Black olives, pitted and halved
- Fresh basil leaves (optional)
- 2 tbsp melted butter
Instructions
-
Step 1Preheat oven to 400°F (200°C).
-
Step 2Set up three shallow dishes: flour in one, beaten eggs in another, and panko mixed with garlic powder and Italian seasoning in the third. Season chicken tenderloins with salt and pepper.
-
Step 3Dredge each chicken piece in flour, then egg, then panko mixture, pressing breadcrumbs firmly to adhere.
-
Step 4Heat 1/2 inch oil in large skillet over medium heat. Fry chicken pieces 3-4 minutes per side until golden brown. Don't overcrowd pan.
-
Step 5Cut Hawaiian rolls in half horizontally, keeping them attached. Place bottom half in 9x13 baking dish.
-
Step 6Spread half the marinara sauce on bottom rolls. Layer fried chicken pieces, then remaining marinara sauce.
-
Step 7Place thin mozzarella slices on top, leaving gaps for skull effect. Press halved black olives into cheese for 'eyes' - two per slider.
-
Step 8Place top halves of rolls on sliders. Brush tops with melted butter and sprinkle with Parmesan cheese.
-
Step 9Cover with foil and bake 15 minutes. Remove foil and bake 5-10 minutes more until cheese is melted and tops are golden brown.
-
Step 10Let cool for 5 minutes before cutting and serving. Garnish with fresh basil if desired.