Okay, so I need to confess something right off the bat. The first time I tried making a Classic Cinnamon Crumb Coffee Cake, it came out looking like a sad, flat pancake. The second time? Burned edges, raw middle. Disaster. Complete disaster.
But here’s the thing—I’m stubborn. My neighbor Linda kept bragging about her coffee cake, and I refused to be outdone. So I tried again, and finally, FINALLY got it right. Now people actually ask me to bring this to brunch gatherings, which is honestly shocking considering my track record.
Table of Contents

Why This Classic Cinnamon Crumb Coffee Cake Is Worth Your Time
Look, I’m gonna be honest with you. There are approximately 47 million coffee cake recipes online, and most of them are just… meh. Either they’re too dry, or the crumb topping slides off, or they taste like cardboard pretending to be cake.
This one’s different. And I’m not just saying that because I spent three weekends perfecting it while my husband questioned my sanity.
The thing about a good cinnamon coffee cake is that it should be moist—not wet, but like, actually tender—with enough cinnamon to taste it without overwhelming everything else. And that crumb topping? It needs to stay PUT. None of this “it all falls off when you cut it” nonsense.
My Messy Journey to the Perfect Coffee Cake Recipe
So this recipe is kind of a Frankenstein situation. I started with something I found on Pinterest (I think?), added techniques from a Starbucks copycat recipe, and threw in what my mom always did with sour cream coffee cakes. The result is this beautiful hybrid that tastes like it came from an actual bakery.
My 6-year-old calls it “the crumbly cake,” and honestly, that’s the best description. She refuses to eat anything with raisins, but somehow devours this for breakfast, lunch, and would eat it for dinner if I let her.
Speaking of Starbucks, have you noticed their coffee cake is never consistently good? Sometimes it’s amazing, sometimes it tastes like they forgot half the ingredients. This homemade version beats it every single time. Plus, you know exactly what’s going into it, which is nice when you’re trying to avoid whatever preservatives they use to keep things “fresh” for weeks.
What You’ll Need for This Yummy Coffee Cake
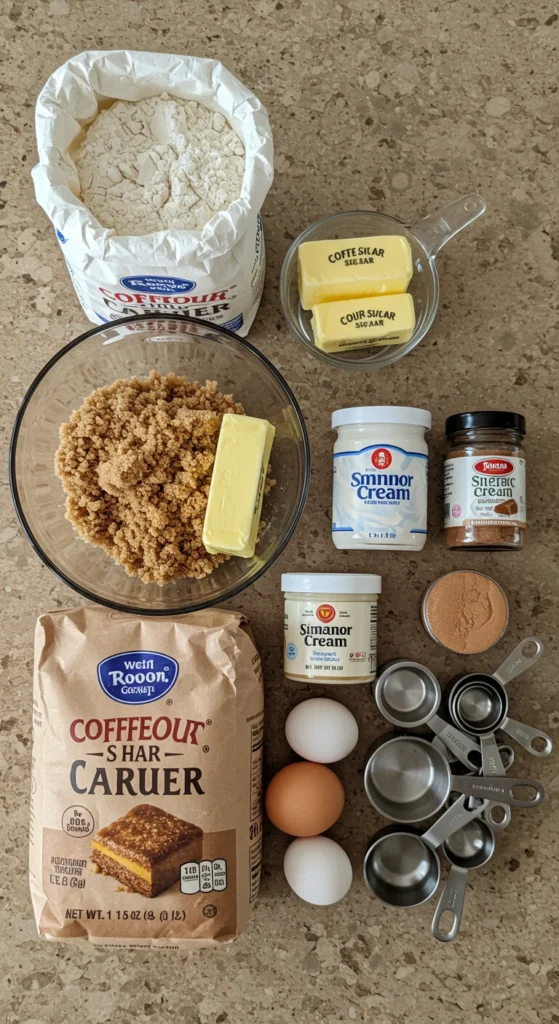
For the Crumb Topping (Make This First or You’ll Forget):
- 1/2 cup all-purpose flour
- 1/2 cup packed brown sugar
- 1 1/2 teaspoons ground cinnamon
- 1/4 cup cold butter, cut into small pieces (and I mean COLD—straight from the fridge)
- Pinch of salt (don’t skip this, it makes everything taste better)
Quick note: I use salted butter for everything because I’m lazy and it’s what I always have on hand. If you’re using unsalted, maybe add a tiny bit more salt to the topping. Or don’t. I’m not the boss of you.
For the Cake:
- 2 cups all-purpose flour (I’ve tried cake flour thinking I was fancy, but regular flour works better here)
- 1 teaspoon baking powder
- 1/2 teaspoon baking soda
- 1/2 teaspoon salt
- 1/2 cup unsalted butter, softened (or salted, see above rant)
- 1 cup granulated sugar
- 2 large eggs (room temperature is ideal, but I’ve used cold eggs straight from the fridge and it turned out fine)
- 1 cup sour cream (this is THE secret ingredient—don’t substitute with yogurt unless you absolutely have to)
- 2 teaspoons vanilla extract (the real stuff, not imitation. Trust me on this one)
- 1 tablespoon ground cinnamon for swirling
Shopping Tips from Someone Who’s Made Every Mistake:
Good luck finding decent sour cream that’s not about to expire. I swear grocery stores hide the fresh stuff in the back. Also, use full-fat sour cream. I tried the low-fat version once thinking I was being healthy, and it was just… sad. Dense and flavorless.
And please, PLEASE buy whole cinnamon and grind it yourself if you can. I know that sounds pretentious, but pre-ground cinnamon that’s been sitting in your cabinet since 2019 isn’t doing this cinnamon crumb cake any favors. Found this out the hard way when my first attempt tasted like dusty sadness.
How to Actually Make This Classic Cinnamon Crumb Coffee Cake
Step 1: The Crumb Topping (Don’t Skip Making This First)
Mix together the flour, brown sugar, cinnamon, and salt in a medium bowl. Then add those cold butter pieces and use a fork (or your fingers, which works better honestly) to work it into the dry ingredients until it looks like wet sand. Or maybe coarse crumbs? It should clump when you squeeze it.
Important: If your butter isn’t cold enough, this won’t work right. It’ll just turn into paste. Been there, had to start over. Super annoying.
Pop this bowl in the fridge while you make the cake batter. This keeps the butter cold so the topping actually stays crumbly instead of melting into the cake. Learned this after wondering why my first attempt had no distinct topping layer.
Step 2: Prep Your Pan (Because Future You Will Thank Present You)
Preheat your oven to 350°F. Wait, let me back up—preheat your oven FIRST before doing anything else. I can’t tell you how many times I’ve gotten to this step and realized my oven is still cold.
Grease a 9×13 inch baking pan really well. Like, don’t be shy with the butter or cooking spray. You want this cake to come out cleanly. I also line the bottom with parchment paper because I’m paranoid after having too many cakes stick and fall apart.
Step 3: Mix the Dry Ingredients
In a medium bowl, whisk together the flour, baking powder, baking soda, and salt. Set this aside.
This step seems pointless, and honestly, I’ve skipped it when I was feeling lazy. But mixing the leavening agents into the flour first helps them distribute evenly, which means your cake rises consistently instead of having weird dense spots. Which I definitely never had happen to me. Multiple times.
Step 4: Cream That Butter and Sugar
In a large bowl (or your stand mixer if you’re fancy), beat the softened butter and sugar together until it’s light and fluffy. This takes like 3-4 minutes with an electric mixer. Your arm will fall off if you try this by hand, so don’t.
The key is—oh wait, I forgot to mention—make sure your butter is actually softened. Not melted, not cold. Softened. Press it with your finger and it should leave an indent without your finger going straight through it.
Real talk: I’ve made this with butter that was too cold (lumpy batter, weird texture) and butter that was too soft/melted (flat, greasy cake). The right temperature matters here, which is annoying but true.
Step 5: Add Eggs and Sour Cream
Beat in the eggs one at a time, mixing well after each addition. Then add the sour cream and vanilla. Mix until everything is combined and smooth.
It’ll look kinda weird at this point—maybe a little curdled or separated? That’s totally normal. Don’t panic. I definitely didn’t panic the first time. (I panicked.)
Step 6: Combine Everything
Add the dry ingredients to the wet ingredients and mix on low speed just until combined. Do NOT overmix this. I repeat, do NOT overmix. You’ll develop the gluten too much and end up with tough, chewy cake instead of tender, crumbly cake.
Once you don’t see any more dry flour streaks, STOP MIXING. Walk away from the bowl. It’s done.
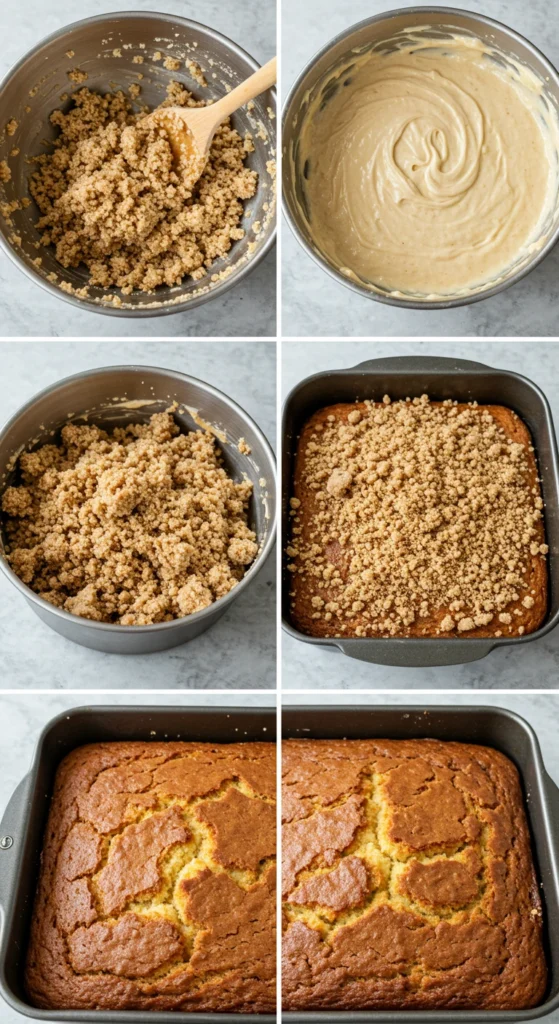
Step 7: The Assembly (This Is Where It Gets Fun)
Spread half the batter into your prepared pan. It’ll be thick—like, you might need to use a spatula to push it around. That’s normal.
Sprinkle that tablespoon of cinnamon evenly over the batter. I use a small fine-mesh strainer for this so it distributes evenly, but you can also just use your fingers to sprinkle it around. Either way works.
Carefully spread the remaining batter on top. It’s okay if the cinnamon layer gets a little mixed in—you’re going for a swirled effect anyway. Don’t stress about making it perfect. It’s cake, not surgery.
Step 8: Add the Crumb Topping
Take that crumb mixture out of the fridge and sprinkle it all over the top of the cake. Use it ALL. Don’t hold back. This is not the time to be conservative with crumb topping.
Press it down very gently—like, barely touching it—so it sticks to the batter. But don’t press hard or it’ll just sink into the cake and disappear. Found this out when my second attempt had invisible crumb topping.
Step 9: Bake It
Bake for 45-55 minutes, or until a toothpick inserted in the center comes out clean or with just a few moist crumbs. Mine usually takes about 50 minutes, but ovens vary wildly.
The top should be golden brown and the crumb topping should look set and crispy. If the edges are getting too dark but the middle isn’t done yet, tent some foil over the top for the last 10-15 minutes.
Set a timer. Seriously. I’ve forgotten this cake in the oven too many times. Last Thursday I got distracted by a phone call and nearly burned the whole thing. The smoke alarm went off and everything. Not my finest moment.
Step 10: Cool Down (The Hardest Part)
Let the coffee cake cool in the pan for at least 20-30 minutes before cutting into it. I know this is torture when your house smells AMAZING and you just want to eat warm cake, but if you cut it too soon, it’ll fall apart into a crumbly mess.
Actually, you know what? Sometimes I eat it warm anyway and just deal with the messy slices. Life’s short. Eat the warm cake if you want.
Tips I Wish Someone Had Told Me Before I Started
Room Temperature Ingredients: This isn’t just me being picky. Room temperature eggs and sour cream mix into the batter way better than cold ingredients. They create a smoother batter that rises more evenly. But like I said earlier, I’ve used cold stuff in a pinch and it was fine. Just not quite as good.
The Sour Cream Thing: Some people ask if they can use Greek yogurt instead. I mean, you CAN, but it won’t taste the same. Sour cream has more fat and a tangier flavor that makes this coffee cake recipe taste richer. Greek yogurt makes it taste… healthy. Which isn’t always what you want from cake.
Freezing: This freezes incredibly well. Cut it into pieces, wrap them individually in plastic wrap, then put them all in a freezer bag. They’ll keep for like 3 months. Just microwave a piece for 30 seconds when you want a quick breakfast or snack.
My neighbor Sarah (not the one who brags, a different Sarah) swears by freezing individual slices and taking them to work for breakfast. She says it thaws perfectly by the time her morning meeting ends.
Make It Fancier: Sometimes I’ll drizzle a simple glaze over the top—just powdered sugar mixed with a little milk or cream until it’s pourable. Totally optional, and honestly, the cake doesn’t need it. But it looks prettier for brunch gatherings when you’re trying to impress people.
Coffee Pairing: This is called coffee cake for a reason. It’s AMAZING with a strong cup of coffee. The sweetness of the cake balances out bitter coffee perfectly. I’m obsessed with pairing it with dark roast, but any coffee works.
What Makes This Different from Other Cinnamon Coffee Cake Recipes
Honestly? The sour cream. That’s the game-changer here. It makes the cake incredibly moist and tender with this slight tang that cuts through all the sweetness. Without it, you just have a regular cinnamon cake. Which is fine, but not special.
The crumb topping ratio is also crucial. A lot of recipes don’t have enough crumb topping, or it’s too dry and falls off when you cut the cake. This one has the perfect amount and it actually stays put because we press it gently into the batter before baking.
And that cinnamon swirl in the middle? That’s what makes people think you know what you’re doing. It creates these beautiful layers and pockets of cinnamon throughout the cake instead of just having cinnamon mixed into the batter.
Why This Beats the Starbucks Coffee Cake (Fight Me)
Okay, maybe “beats” is strong. But it’s definitely as good, and you can eat it warm from your own oven, which automatically makes it better. Plus, you’re not paying $4 for a slice that might be dry depending on how long it’s been sitting in their display case.
The Starbucks recipe—or their version of a cinnamon crumb cake—is good, don’t get me wrong. But it’s also more processed and less… personal? This tastes like someone actually made it with love and butter. Lots of butter.
Common Questions (That I Had Too)
Can I make this the night before? Yes! It actually tastes better the next day after the flavors have melded. Just cover it tightly with foil or plastic wrap and leave it on the counter. It’ll stay moist for 3-4 days. If it lasts that long, which it won’t.
Why is my crumb topping not crumbly? Your butter was probably too warm. Or you didn’t chill the mixture before adding it to the cake. The butter needs to stay cold so it creates distinct crumbs instead of melting into the cake.
Can I halve this recipe? Sure, use an 8×8 or 9×9 pan instead. Same baking temperature, but check it around 35-40 minutes instead of the full time.
Is this actually a cake or more like a bread? This is one of those philosophical debates like “is cereal soup?” It’s technically a cake because of the crumb and texture, but we call it coffee cake because you eat it with coffee for breakfast. Don’t overthink it.
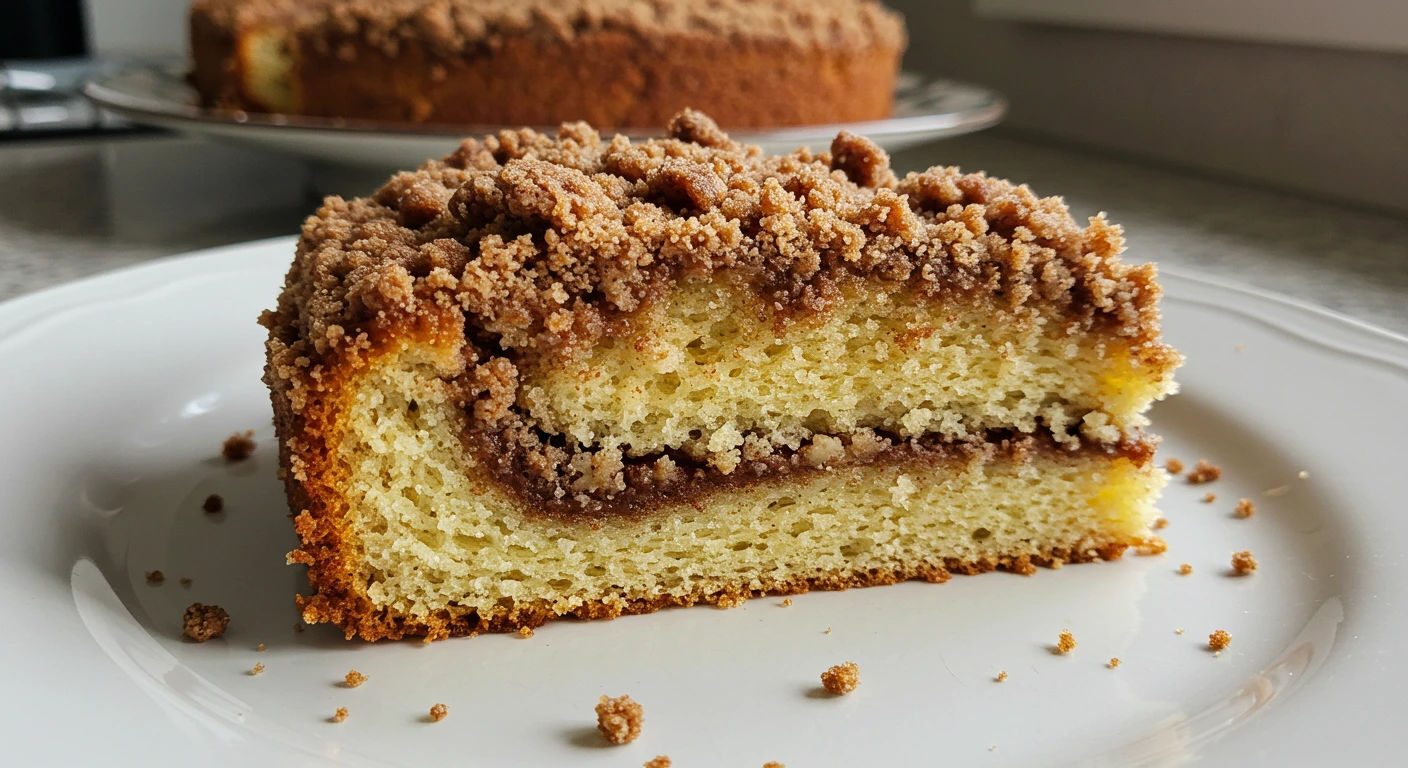
Classic Cinnamon Crumb Coffee Cake
This Classic Cinnamon Crumb Coffee Cake features moist sour cream cake, a buttery crumb topping, and a delicious cinnamon swirl. Perfect for breakfast or brunch, better than Starbucks coffee cake and easy to make at home.
Ingredients
- 1/2 cup all-purpose flour (for crumb topping)
- 1/2 cup packed brown sugar (for crumb topping)
- 1 1/2 teaspoons ground cinnamon (for crumb topping)
- 1/4 cup cold butter, cut into small pieces (for crumb topping)
- Pinch of salt (for crumb topping)
- 2 cups all-purpose flour (for cake)
- 1 teaspoon baking powder
- 1/2 teaspoon baking soda
- 1/2 teaspoon salt
- 1/2 cup unsalted butter, softened
- 1 cup granulated sugar
- 2 large eggs
- 1 cup sour cream
- 2 teaspoons vanilla extract
- 1 tablespoon ground cinnamon (for swirl)
Instructions
-
Step 1Mix together 1/2 cup flour, 1/2 cup brown sugar, 1 1/2 teaspoons cinnamon, and pinch of salt. Add cold butter pieces and work into dry ingredients with fork or fingers until mixture resembles coarse crumbs. Refrigerate while making cake batter.
-
Step 2Preheat oven to 350°F (175°C). Grease a 9x13 inch baking pan well and optionally line bottom with parchment paper.
-
Step 3In medium bowl, whisk together 2 cups flour, baking powder, baking soda, and 1/2 teaspoon salt. Set aside.
-
Step 4In large bowl or stand mixer, beat softened butter and granulated sugar together until light and fluffy, about 3-4 minutes.
-
Step 5Beat in eggs one at a time, mixing well after each addition. Add sour cream and vanilla extract, mixing until combined and smooth.
-
Step 6Add dry ingredients to wet ingredients and mix on low speed just until combined. Do not overmix. Stop mixing when no dry flour streaks remain.
-
Step 7Spread half the batter into prepared pan. Sprinkle 1 tablespoon cinnamon evenly over batter. Carefully spread remaining batter on top.
-
Step 8Remove crumb mixture from refrigerator and sprinkle evenly over top of cake batter. Press down very gently so it sticks to batter.
-
Step 9Bake for 45-55 minutes, or until toothpick inserted in center comes out clean or with just a few moist crumbs. If edges brown too quickly, tent with foil for last 10-15 minutes.
-
Step 10Let coffee cake cool in pan for 20-30 minutes before cutting. Serve warm or at room temperature.
Final Thoughts on This Classic Cinnamon Crumb Coffee Cake
This recipe has become my go-to for basically any morning gathering. Brunch? Coffee cake. Breakfast meeting? Coffee cake. Random Sunday when I want something sweet? You guessed it.
It’s not fancy or complicated, but it’s consistently good. And honestly, that’s more important than some elaborate recipe that only works half the time.
If I can make this without completely messing it up (after three attempts, but still), anyone can. The ingredients are simple, you probably have most of them already, and the process is straightforward once you know the tricks.
Let me know how yours turns out! Seriously, try this and tell me what you think. I’m always curious if it works as well in other people’s kitchens or if I just got lucky.
And if you burn it the first time, don’t worry. Join the club. We meet Tuesdays and serve slightly overdone coffee cake.
Happy baking! (and may your crumb topping stay exactly where you put it) ☕️